Airlift suspension kits are the must-have upgrade for those, like ourselves, tow loads with heavy nose weights. Prevents permanent spring damage & sagging rear ends from continous compression without enduring rock-hard, bum-up ride from hard springs & shocks when solo. Will allow the driver to level the outfit helping stability, braking & preventing sway. These kits are simple air bags fitted inside the coil springs. The bags are manufactured from poly so are impervious to perishing & are pressurised/adjustable from 5-35 psi depending on spring assistance & ride height required. Minimum 5 psi adds 5mm of ride height to rear end of a Grand Cherokee WJ (when solo), maximum 35 psi adds approximately 30mm & is of course, considerably harder taking alot more weight to reduce this additional ride height. Air pressure can be provided by airline, 12v tyre inflator, foot pump etc or we have small 12v on-board compressors kits with gauges available to inflate or deflate at the touch of a button. We have the kits for Jeep Commander, Wrangler TJ, Grand Cherokee ZJ, WJ, WK, & Cherokee KJ
The following are pictures of fitting an Airlift Air Suspension Airbag kit and Load Controller II to our Grand Cherokee 4.7 HO Overland. Click on pictures to enlarge.
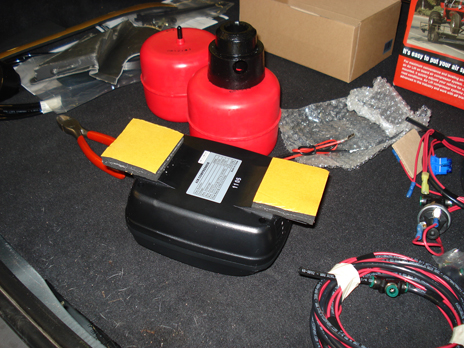
Kit components showing the compressor unit fitted with adhesive rubber mounting pads which will secure the unit to the inside of the rear wing panel.
Removal of the interior trim mouldings including the CD multi-changer.
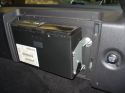
The compressor mounted inside the rear wing panel away from the elements & out of harms way.
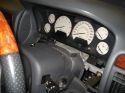
Removal of the trim moulding below the instrument cluster.
Trim moulding removed showing the method/type of securing.
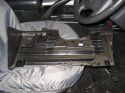
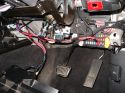
Lower dash panel removed giving access to the fuse board.
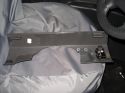
Lower trim moulding showing our chosen position of mounting the control panel.
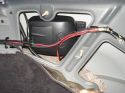
The wiring loom behind the lower dash moulding showing the position of the low pressure switch next to the steering column. This gives good access to the fuse.The wiring loom & air line is then routed behind the lower kick panel to the inner sill.
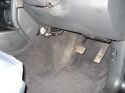
The dash mouldings refitted. The control panel position was checked prior to instalation for susceptability of kicking, catching with boots etc by drivers of several sizes from 12 – 25 stones & 5′ 7″ -6′ 2″ . None found it easy to catch the panel in this position with their feet yet it is easy to operate. Of course position is personal choice & fitting here is not compulsory.
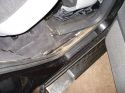
Door shut mouldings removed for routing of wiring loom & air line.
Another picture showing door shut moulding removed.
A 19mm/3/4″ hole was drilled through the floor panel to accept the loom & air line protected by a grommet. Note the bare metal edges of hole are painted with zinc-galvo primer to protect from rusting.
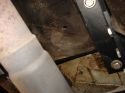
The hole position from the underside. On the right of the picture is the tow hitch bracket & the left the exhaust tail pipe.
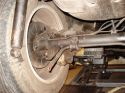
The rear axle lowered following the removal of the lower shock absorber mountings, anti-roll bar (sway bar) links & road springs. If in doubt, mark the position of the road springs with paint or Tipex.
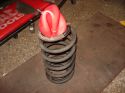
The air springs are collapsed using a knee & the cap refitted to prevent ingress of air to keep them collapsed whilst folding & inserting in the bottom of the road springs. Note hose tail to the bottom (the spring is up-side-down in the picture).
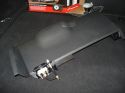
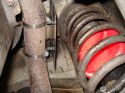
The road spring/air spring refitted & air line attached. We protected our air lines with retrofit split conduit & routed/secured them alongside the brake lines which appeared neat.
The heatshield mounted on the exhaust rear pipe to protect the air spring. This is not applicable to all model kits. Again, this is the Grand Cherokee WJ 99-2005.
Before And After Comparisons
On the Ramp. With the minimum required 5 psi operating pressure it raised the vehicle just 5mm. At the maximum 35 psi it raised the vehicle 30mm but also made it hard & difficult to compress. Pictures show before/after.
With The Caravan. The vanmaster caravan has a very high nose weight. The first picture shows the rear end compressed/front high & jockey wheel prone to grounding out. In the second picture the tow ball was actually dropped to the lowest of the two positions available on the hitch but still the outfit is riding level, the vehicle front has lowered, there is additional jockey wheel clearance & the suspension is hard enough to prevent it compressing further under normal conditions without giving a poor/harsh ride. The tow pivot point is now lower to the axle with the ball on the lower mounting which only helps stability. When solo, just push the button & drop the pressure!


))
))
))
))
))
))
))
))
))
))
))
))
))
))
))
))
))
))
))
))
))